
How to Make Beeswax Food Wraps (Reusable Cling Wrap)
With just a few simple supplies and a little time, you can create your own custom beeswax food wraps at home!

Today’s article is a redo of a very old one on my other website, Measuring Flower (you can see that article–terrible photography and all–here). It’s a good tutorial for making beeswax food wraps though (and one of the very first, original ones ever on the internet), and it definitely has to do with food, so I decided to rewrite it here on TJ’s Taste, complete with MUCH better photography and an improved process and directions.
What are Beeswax Food Wraps?
Beeswax food wraps, also known as reusable cling wrap, beeswax wraps, wax wraps, food wraps, and probably some other things I can’t think of at the moment, are reusable pieces of cloth coated in beeswax (and sometimes other ingredients) that are used to preserve food or keep food fresh, serving as an eco-friendly plastic wrap alternative.
Beeswax Food Wraps Cost
Beeswax food wraps can be bought online and in some health food or natural grocery stores. But, typically, it is pretty expensive. Like $20 for 3 or 4 little wraps.
But making the wraps homemade is super easy, doesn’t take too much time, and costs a LOT less than buying them already made. Plus, you can customize their size and shape to fit the dishes you want to cover AND you can use fabric in your favorite colors or patterns!

When I made these wax wraps, I bought a new bag of beeswax pellets and pine rosin (optional) and I used some fabric that I already happened to have on hand (mostly scraps that my mom or mother-in-law gave me for free). Since I didn’t use all of the wax or pine rosin, the total cost for all of my wraps was probably around $5 for 15 wraps!
If you don’t want extra wax or rosin hanging around your house, you can host a reusable cling wrap party with some friends.
How to Make Beeswax Food Wraps
Supplies
- cotton fabric – In pattern and color of your choosing. Make sure it is 100% cotton, no blends. Wash and dry before using it for your wrap (and iron if there are any annoying wrinkles).
- measuring device – A ruler, yard stick, quilting ruler, or other measuring tool will work.
- chalk – For marking your measurements on the fabric. You can use a pencil or marker or something else instead.
- pinking shears – This is to cut out the fabric. Pinking shears are awesome because the zig-zag cut prevents the edges of the fabric from fraying as easily.
- beeswax – I used pellets (a.k.a. pastilles), but you can also use blocks, just shred them or cut them into tiny chunks. Also, make sure the wax is food safe or cosmetic grade (unbleached and no other chemicals added).
- pine rosin – Also known as pine resin. This ingredient is optional. Pine rosin is basically dried up pine tree sap. When added to the wax for the wraps, it makes the wrap stickier or more clingy.
- unrefined coconut oil – Unrefined or extra virgin coconut oil works best. This ingredient is optional. When added to the wax, it makes the wax softer and the wrap therefore more pliable.
- disposable baking dish – You don’t have to use disposable, but using disposable makes the process a little less messy. A glass baking dish will work just as well.
- tongs – Metal or heat resistant silicone ones work best.
- parchment paper – This will be used to allow the wax to “dry.” The wax doesn’t take long to harden, so you can feasibly keep reusing the same sheet of parchment paper–just remove the previous wrap before making the next one.
- spatula – Make sure it has a straight, flat, rigid edge. Something like a credit card would work also–basically, any rigid tool with a flat edge (this is to scrape off excess wax).

Instructions
- Measure and cut the fabric. Measure your fabric to the desired size then, using the pinking shears, cut it out. Make sure there is enough excess (an inch or so) to serve as overlap for whatever dishes it may be covering. You can make the wraps rectangular, circular, square, or any other shape to fit the dishes that you intend to cover with them. This is probably the biggest advantage (besides cost savings) of making your own cling wrap versus buying it pre-made.
- Heat up ingredients. In your baking dish, add the wax pellets (or shredded wax), rosin (if using–be sure to crush it some, don’t leave it in big chunks like my picture shows), and coconut oil. Pop it in the oven at 215° F until melted/dissolved (10 minutes, give or take). Be warned that the rosin can set on fire so don’t overheat it!!! Do NOT heat the rosin in the microwave (again, it can set on fire).
- Dunk the fabric. Using your tongs, dip the fabric pieces one at a time in the melted/dissolved wax or wax mixture. Move it around until every bit of the fabric has absorbed some of the liquid. If the liquid solidifies, pop back in the oven to re-melt it.
- Let the wax harden. After the fabric piece is fully soaked, hold it up with the tongs to allow as much excess wax as possible to drip off back into the glass dish. Then, lay the wrap completely flat (avoid wrinkles and folds) on a sheet of parchment paper until completely hardened/cooled down.
- Remove excess wax. After the wax has hardened on the wrap, take your straight-edged spatula and scrape off the excess wax from the surface of both sides of the wrap. Don’t press too terribly hard while doing this as that can rip the fabric.
- In a pot big enough to hold your wax-covered glass dish, bring water to a boil. If you used a disposable baking dish instead, then bring water to a boil in a small saucepan just big enough to clean off the utensils you used.
- CAREFULLY and SLOWLY lower the glass dish into the boiling water.
- Dip the tong tips and the spatula tip into the boiling water and carefully swish them around a bit to melt the wax off of them.
- Remove the pot from the heat and immediately remove the glass dish.
- Immediately dry off the glass dish and utensils with paper towels. This helps to remove any waxy residue before it re-hardens.
- Dump the water in the pot OUTDOORS (do NOT pour it down any drains as it can plug them up). The wax, rosin, and oil are all biodegradable, so it won’t hurt anything outside.
- If there is still waxy residue on anything, rub it off with a paper towel and some olive or avocado oil.
- Clean the dishes with soap and water or in the dishwasher as usual.
cotton fabric (any color or pattern; must be 100% cotton, no blends; washed and dried)- measuring device
(ruler, yard stick, quilting ruler, etc.) chalk (or other tool for marking measurements on fabric)pinking shears - 5 parts
beeswax (pellets or shredded blocks; make sure it's food safe or cosmetic grade) - 1 part
pine rosin (optional; makes it stickier) - 1 part
unrefined coconut oil (optional; makes it softer) glass baking dish or disposable baking dish tongs (heat safe)parchment paper spatula (or other rigid tool with a straight edge)- Preheat oven to 215° F.
- Measure and cut the fabric. Measure your fabric to the desired size then, using the pinking shears, cut it out. Make sure there is enough excess (an inch or so) to serve as overlap for whatever dishes it may be covering. You can make the wraps rectangular, circular, square, or any other shape to fit the dishes that you intend to cover with them.

- Heat up ingredients. In your baking dish, add the wax pellets (or shredded wax), rosin (if using–be sure to crush it some, don’t leave it in big chunks like my picture shows), and coconut oil. Pop it in the oven until melted/dissolved (10 minutes, give or take). Be warned that the rosin can set on fire so don’t overheat it!!! Do NOT heat the rosin in the microwave (again, it can set on fire).

- Dunk the fabric. Using your tongs, dip the fabric pieces one at a time in the melted/dissolved wax or wax mixture. Move it around until every bit of the fabric has absorbed some of the liquid. If the liquid solidifies, pop back in the oven to re-melt it.

- Let the wax harden. After the fabric piece is fully soaked, hold it up with the tongs to allow as much excess wax as possible to drip off back into the glass dish. Then, lay the wrap completely flat (avoid wrinkles and folds) on a sheet of parchment paper until completely hardened/cooled down.

- Remove excess wax. After the wax has hardened on the wrap, take your straight-edged spatula and scrape off the excess wax from the surface of both sides of the wrap. Don’t press too terribly hard while doing this as that can rip the fabric.

- You might want to scrunch up the wraps to make them less rigid and more pliable just before each use. Then simply drape one over your bowl or dish and press it down along the edges and sides. The wax (with a bit of help from the heat of your hands) will stick to the edges and sides of the dish, forming an airtight seal and keeping your food fresh!

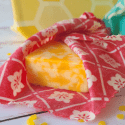
- If using the wrap for something like a block of cheese or a sandwich, you can wrap it up like a Christmas gift.

- To wash off the beeswax wraps, use COLD water (avoid any warm to hot water lest the wax melt off and plug up your drain) and mild dish soap. Do NOT scrub the wraps with anything abrasive as this will also remove the wax. And, obviously, do NOT run them through the dishwasher (that would cause a massive mess of wax everywhere inside your dishwasher!). Lay to dry on a towel or in a dish rack.

- To store the wraps, simply fold them like you would any other piece of cloth and keep them in your drawer ready to go.


Beeswax Food Wraps How To Video
How to Use Beeswax Food Wraps
You might want to scrunch up the wraps to make them less rigid and more pliable just before each use. Then simply drape one over your bowl or dish and press it down along the edges and sides. The wax (with a bit of help from the heat of your hands and the rosin if you use it) will stick to the edges and sides of the dish, forming an airtight seal and keeping your food fresh!

If using the wrap for something like a block of cheese or a sandwich, you can wrap it up like a Christmas gift.

How to Wash Beeswax Food Wraps
Just to let you know, beeswax has natural antimicrobial properties, so it is resistant to bad germs. However, these beeswax wraps still need to be washed off regularly.
To wash off the beeswax wraps, use COLD water (avoid any warm to hot water lest the wax melt off and plug up your drain) and mild dish soap. Do NOT scrub the wraps with anything abrasive as this will also remove the wax. And, obviously, do NOT run them through the dishwasher (that would cause a massive mess of wax everywhere inside your dishwasher!). Lay to dry on a towel or in a dish rack.

How to Store Beeswax Food Wraps
To store the wraps, simply fold them like you would any other piece of cloth and keep them in your drawer ready to go.

Cleaning Up After Making Beeswax Food Wraps
After you’re done making these cling wraps, you will have to clean wax and rosin off your glass dish (if you used one), your tongs, and maybe your spatula. Here’s how to make this task a little easier.

IMPORTANT NOTE: Some people report that the rosin leaves the dishes they used to make these reusable cling wraps sticky for a long time or even forever. I personally did not have this problem (the boiling water washed everything off including the rosin), but to be on the safe side you might want to use old dishes/utensils for making these wraps.
Beeswax Food Wraps FAQs
Below are some FAQs concerning these wraps. To view them, click on a question to toggle the answer open.
[faq-concertina category=”beeswax-food-wraps-faqs”]


